Esign Remote Setup
Note: E-Sign module will need to be configured before using.
1. Monthly Service Agreement
You will need to sign up for the POR eSign service at www.rentalesign.com/signup and enter your company information. Select the number of packages on the first page, then enter your credit card information on the second page, then you can set up a password once the account as been created. This will allow you to send out the number of esign documents you have sign up for.

Once your account has been set up, you will be able to view the number of packets you have used vs how many you have left for the month. Under the Company Status, you will need to save your username and API key to finish the set up in your Point of Rental software.
Multiple Accounts - One account can be set up for multiple locations, the monthly service fee would be times the number of store locations and packets to give you a total for all locations.
ex. If you choose a packet package, the amount of the package would be times the store locations (100 x 150/mo x 3 stores = $450/mo) total number of packets would be 300.
Packets - Packets will be charged to service account once the esign has been sent out.
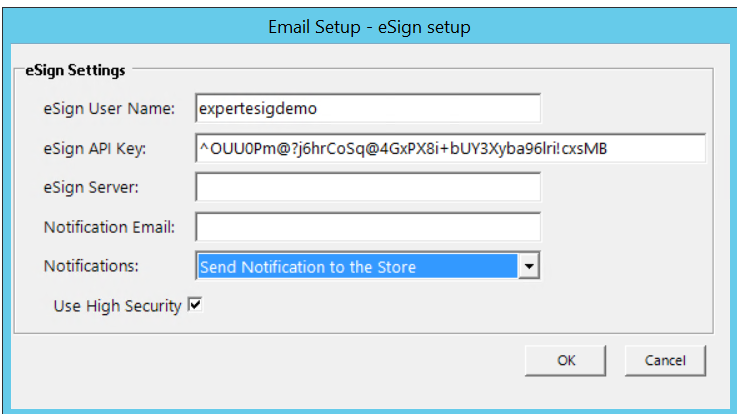
2. E-Sign Setup
Program Menu>Configurations>Reports and Notifications>System Email Setup. Enter the username and API key in the appropriate fields. If you have separate eSign accounts for each of your stores, the proper User Name and API Key would need to be entered for each.
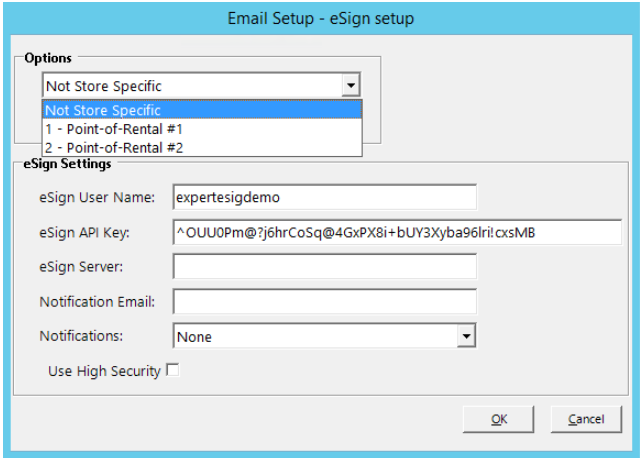
eSign User Name: This is the username you set up in your eSign Web page
eSign API Key: Enter the API Key from you eSign Web page.
eSign Server: This can be left blank
Notifications Email. Enter email address on who is to receive notifications when sending or receiving an esign document.
Notifications: You can send a notification to the 'sending employee', sending store or both
Use High Security: With the High Security box checked, an extra level of security. Receiving party will be prompted a message to enter their email, confirming they are the correct party to sign the document. Unchecked, no message will be prompted.
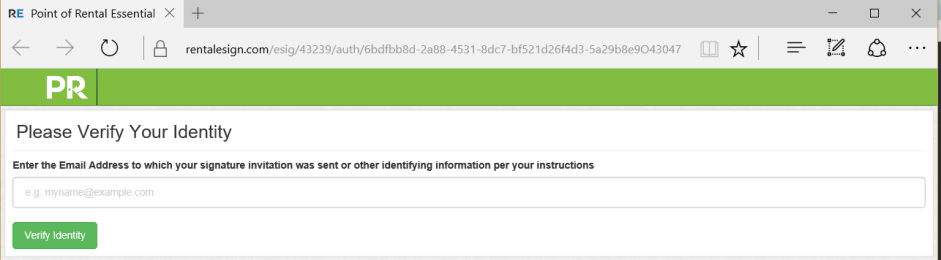
High Security
With the High Security box checked, customer receiving the esign email will be required to enter their email address to verify their Identity.
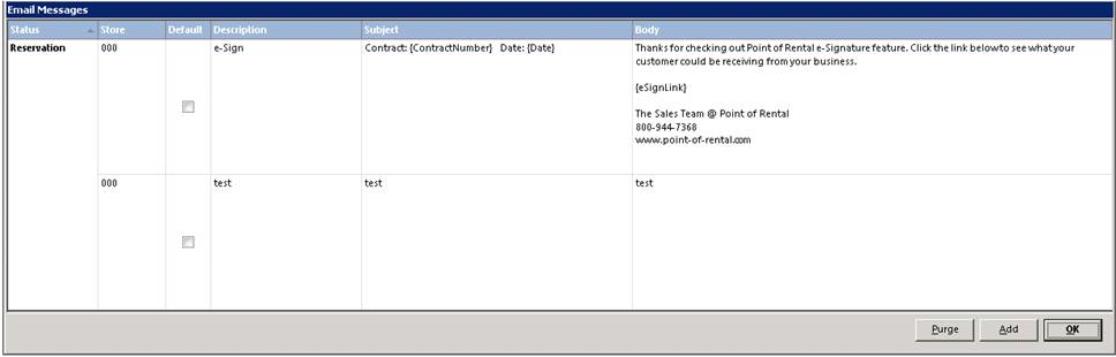
3. System Configurations>Email Letters
Select Add button, create a new email message. You can create a general message to be used with (Reservations and Open) contracts.
Click on add to create email.

eSign Default:
Checking the default box: Will mark this email letter as your default letter when sending out emails. (Whether you choose regular email or email with electronic signature).
Unchecking the box: Will automatically enter the eSignLink to the body of the email when selecting email with electronic. If selecting regular email, then only the standard email letter will be sent.
From Day at a Glance, select contract to email, from the print screen you can select Email electronic signature and click on the email button.

* Note - If you select the email with electronic signature, by default, the esign link will added to the email letter. If you select email only the link will not be added to the email body.
Toggle Option:
In the upper left corner, you can either select Standard Message and the contract type (Reservation, Open) where you created the email message.
Note: This is the email letter you set up earlier and will provide the customer with the eSignLink.

You can toggle by either using the Standard Message or the eSign Message. If selecting the e-Sign message it will add the {eSignLink} to the body of the email. This will be the link for the customer to sign the document.

Below is a sample of what the eSignLink your customer will receive will look like. Customer will click on the link to sign the document and return back to you.
Thanks for checking out Point of Rental e-Signature feature. Click the link below to see what your customer could be receiving from your business.
Click Here
The Sales Team @ Point of Rental
800-944-7368
Demo User
Point-of-Rental Systems
800-944-7368
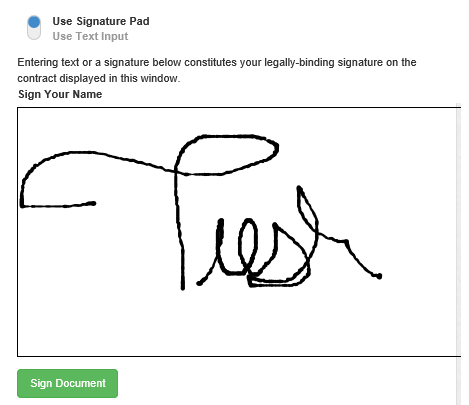
Once the customer clicks on the link, the following documents will be displayed. A PDF view of the contract will be displayed along with the signature box. Click on the Sign Document button to sign the document.

Your customer will enter their signature, and click the Sign Document button when done.
Your customer will be brought to the Review and Confirm Page, they can review the document and have the option of either accepting the signature or redoing. Once satisfied, click on the confirm button. In the top left corner the document will say “Successfully Signed Document”. In your Day at a Glance you will see under the esign column the staus will change to “Requested”.
•Note: You can add a esign column to your Day at a Glance by right clicking on the blue header bar and checking the box for esign. You can move this column to be viewed in any order by selecting the Move Up or Move Down buttons. You would do the same procedure for each tab in Day at a Glance you would like to add the esign column.

Point of Rental will update the status hourly and change it from “requested” to “on file”. You can manually update the status if you are sure your customer had agreed and signed the document, by modifying the contract and going to the Reports tab at the top of the contract and selecting transaction history. Here you will see the document file in a pending status. Click on the pending status to open the document.
•Note: You can set up esign updates frequencies through your System Configurations> Task Runner.

There will be a PDF copy of the contract along with the Offical Signature Page with the customers signature.

When you go back to Day at a Glance, the status in the esign column will be updated to “on file”. When you send out the Reservation, the “on file” status will carry over to the open contract. You will be able to see the status through your Day at a Glance.
To make sure your Esign documents are being updated at a regular interval, you will need to make sure your program is currently up to date ( You can download program updates from configurations>other updates>check for updates). Then go to the POR Task runner (configurations>system configuration>Configure Task Runner ) show in active task and mark the “eSign-get signed documents” as an active task.
4. Setting the scheduled task
You can set a scheduled task on how often esign confirmations will update in Day at a Glance. Once the customer signs and returns the eisgn documents, the status in Day at a Glance will change from “requested” to “on file. You can set the task to update by the minute, hour, day, week, etc.
Go to Program Menu>Configurations>System Configurations>Configure Task Runner
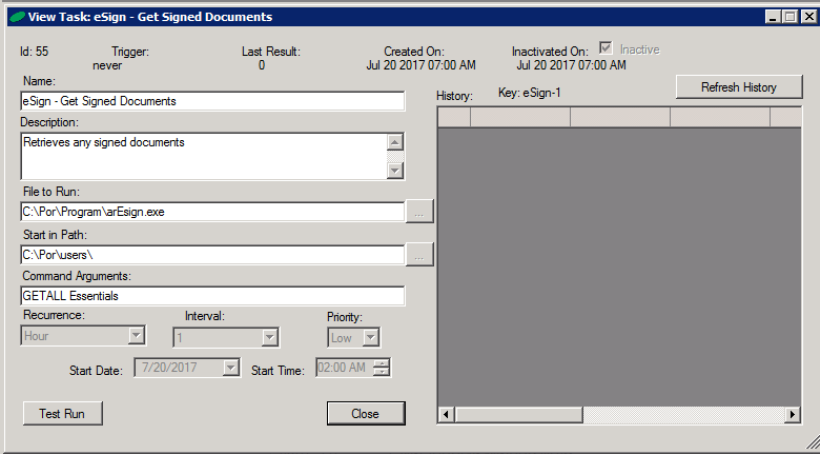
* Note: Change the recurrence from 1 hour to 5 minutes. This will update Day at a Glance every five minutes.
Name: Enter the name of the scheduled task
Description: Enter a brief description of the task.
File to run: Enter the file name . Enter the drive letter your point of rental program is installed on, followed by the file name (See example above)
Path Name: Enter the drive letter followed by the path name. Drive letter will be were your point of rental is installed on. (See example above)
Recurrence: You can set the amount of time between updates, (Minutes, Hours, Days, Weeks, Months)
Interval: This would ab a numberic number entered for the amount of (Minutes, Hours, Days, Weeks, Months)
Start Date: Enter the day when the task is to begin.
Start Time: Select the time when the task is to begin.
•Note: After the first scheduled run, the history will populate each day to confirm the last time the esign updated.
eSign Notifications
Upon signature by the customer, as 'signature received' notification can be sent to either the sending employee, sending store or both. A link to the signed document is included in the notification.
Send Notifications to the Store - Enter the company email in the Notification email will send an email to the store's email.
Send to Employee who Requested - This will use employees email currently set under Security>Employee Set Up, under the contact information.
Esign Attachments
Click on the following link for Esign attachments.